Saturday, August 29, 2009

DIY Project 1: Table Numbers


Last night I decided I would try out making table numbers. I had purchased 10 white frames from the dollar store to use. While at Michaels craft store the other day, I found a 10 pack of white metallic card stock. I only bought one to see if it would work with my printer because a lot of home printers have issues with metallic card stock for some reason.


Luckily, I didn't have that issue. I thought black and white would be too boring, so I decided on purple and green. The font for the words is Lauren Script which I downloaded from dafont.com. The font for the numbers is Lucida Handwriting.


The only problem I had with this project is that even though the dollar store frames are 4x6 and so is the cardstock, it was still too big. It seemed a waste of money to have the cardstock professionally cut to fit, so I did it on my own. Its not a perfect cut, but you can't tell.


I also like the idea of using words for table numbers too. But, I can't decide on whether to use types of wine (because we're getting married at a winery) or just names of alcoholic drinks. What do you think?


Once I decide on wine names vs. alcoholic drink names I can print out the rest. DIY Project #1: PARTIALLY COMPLETE!


Oh, and of course since this is a budget blog, I'll show you the costs, including MD sales tax.


10 White 4x6 picture frames from Dollar Tree: $10.60
10 pack 4.5x6.25 Metallic cardstock from Michaels: $4.76
Colored Printer Ink: $0 (free with purchase of printer!)
Total Cost: $15.36
Not too bad!

Friday, August 28, 2009

The Great Phone Debacle

So this is completely non-wedding related but I thought I'd share just what I've went through trying to get new phones for work. The phones that we have suck. They're 4-line Panasonic phones with 3 cordless handsets. In order to be heard on the handset, you basically need to scream to the party on the other end. So, we decided new phones were in order.

The Search:
We canceled one line figuring that 2-line phones would be easier to find and we might have a better chance of actually being able to hear someone. Well, as it turns out, 2-line phones aren't very popular. At least ones that actually work. Which was kind of important to us. We looked into getting a DECT phone because, well its the new technology and it claims that you won't have the same interference that you have with 5.8 phones. It seemed like a good idea until I read that while DECT phones don't have interference, to actually hear on them, you need to be within 10 feet of the base phone. We have a small office, but 10 feet wasn't going to cut it. Back to searching.

AT&T:
I found a AT&T phone on Newegg.com that said it had 2 lines and had great reviews. It even came with 3 additional handsets and was reasonably price. Score! ...Or not. So the phones arrive and after being really excited at the idea of being able to hear our callers, I realized that the phone not only did not have a Hold button, it didn't actually have 2 lines. Okay fine, easy mistake. Lets send it back and start the search all over again.

Uniden:
I decided that Amazon.com reviews would be pretty accurate and this phone had everything that we needed. Granted, it was more expensive than we planned on paying, but hey, if we could hear people, it would be worth the cost. I found it a little odd that no store carried the base phone and the handsets together, but ordered them from 2 separate websites anyway. The next morning the base phone arrived. Almost immediately afterwards I got an email from the company we ordered the handsets from. The handsets were on National Backorder with no expected date to arrive. Well, this could be an issue as we needed more than 1 phone. I searched some more and called a few places only to find out that they believed this phone was now discontinued and they would never received more. To add insult, I realized a note in the instructions on the base set. That you can not answer Line 2 from any of the handsets. Actually, the only way you can answer Line 2 on any of the phones is to be on a call and press the Flash button. Why in the world would you advertise as a 2-line phone, when there really isn't a line 2??? So I cancel the order for the handsets and drive over to Staples to return the base phone. And then have to get in an argument with the manager because he says they can't be returned without a proof of purchase. So that receipt I printed saying I bought the phones with a credit card is what then exactly? Finally, he agreed to return the phones.

Panasonic:
We were really hesitant to get another Panasonic 5.8 phone because its what we have and we can't hear crap. But, the phones that I found with a good review and rating are the same ones that I have at home. My fiance brought them home from work when they switched his office to a call-center and no longer had a need for them. So, I grilled the fiance. Have you ever been on both lines at the same time? Could you hear an echo? Can you hear the other person? Did you have them near your computers? What about have your cell phone next to it? And you could still hear people? Really? You're sure? He passed the grilling so I went ahead and ordered the phones the next day.

This morning (only 20 hours since I ordered them) they arrived. Excited but hesitant, I took them out of the box and started putting them together. Reading the quickie install manual, I plug in the phones and we don't have Line 2. Its just dead air. So I use the other cord they gave me. Nothing. I stare at the back of the phone for a few minutes and try plugging it into another jack. Still nothing. At this point, I'm frustrated! What in the world do I need to do to have working phones?

I pull out the big manual and find out that we need a jack splitter. Come on now, really? So, I have the guys in the shop head out to Radio Shack or somewhere to get one of these. They're not back yet so I have no idea if these phones will work or not, but hell, 3rd time is the charm, right?

Right? Good lord I hope so!

Monday, August 24, 2009

DIY - its not always easy

Bracelets
After random bio-stalking on theknot, I thought it would be a neat and fun idea to make my bridesmaids pearl bracelets that they could wear again. I checked at Wal-Mart, Target, and even the dollar store before deciding that it was actually cheaper for me to make these bracelets instead of just buying them.


The idea in my head is two strands of pearls on a bracelet with a purple bow to include one of my wedding colors. The bow could be easily removed so the girls could wear them again.


This sounds simple enough, right? Buy some pearl beads, string, clasps, ribbon and you're good to go. ...Yeah, not really. This is prooving to me more of a difficult task that I imagined.


Round 1 - I stood in the craft section of Wal-Mart for about 30 minutes. I picked up two sets of pearl beads, 64 in each pack, a spool of stretchy string, a packet of clasps and some sage green ribbon. (That was the initial color idea.) I go home, all excited and start stringing the beads onto the string. Or tried, I should say. Apparently, the majority of the beads didn't have holes poked through on both sides of the bead, or if it did, it wasn't something that the flimsy stretch ribbon would go through. About halfway through I also realized that I only had 1 end of the clasp and nothing to hook to it. I decided to finish the bracelet anyway, using two claw clasps attached to each other. It actually wasn't bad, but the clasps made it look cheap and it was a real nightmare trying to tie the string onto them.


Faithful to the DIY board on theknot, I posted to find out what to do. Crimping beads was the overall response.


Round 2 - I stopped at AC Moore one day when they had a huge sale going on. I picked up 660 pearl beads, purple ribbon, non-stretchy string, a better set of clasps and the opposite hook, and crimping beads. The following weekend I get everything out and start planning attempt 2 of the bracelet. I can't find the crimping beads anywhere. They weren't in the bag, so I searched my car in case they fell out. Nope. So I look at the receipt. There are no crimping beads on the receipt. Apparently, while I was juggling all of the crap in my arms, I managed to drop the one thing that I had really come for. So, lets just say the bracelet didn't turn out. Sigh!


Stamps
During that last trip to AC Moore, they had buy 1 stamp, get 1 free. I had already learned that wooden rubber stamps are pretty hard to use on my invite mock-ups because I couldn't see where I was placing the stamp. Enter the lovely world of clear stamps! Of course, being as decisive as I am, I stared at the stamps for a good 20 minutes before finally deciding on what I wanted.


After my bracelet debacle, I decided, hell, lets try the rubber stamps. It didn't turn out so well. The stamp instantly got gooey with ink and appeared to smear over parts of the stamp where I didn't want ink. So I stamp the paper and ironically, it looks like I hardly touched the stamp to the ink. It was all splotchy and missing ink in spots. Already peeved about my bracelet issue, I said "EFF it" and threw everything back into the bin-o-wedding stuff.


The Results
Basically, I just wanted to share that not all DIY ideas are genius or right for everyone. Just because it might save you money doesn't mean its not going to cause a headache. I'm not giving up just yet, I mean, I still have a little under 13 months until the wedding.


Maybe I just need more practice with the rubber stamps. Maybe there is some awesome knottie out there reading my post on the DIY board who has the fool-proof response for it. Or maybe, I should just give up on being a perfectionist and not really care if the wooden stamp is 1 centimeter different on each invite. Its not like anyone is going to look at more than one invite at a time.


And maybe the 3rd time will be the charm for the bracelets. Who knows, but I have faith I'll get it right eventually. So, whenever that fateful day happens, I'll be sure to post directions and pictures to guide you through the process.

Friday, August 21, 2009

Inspiration Board


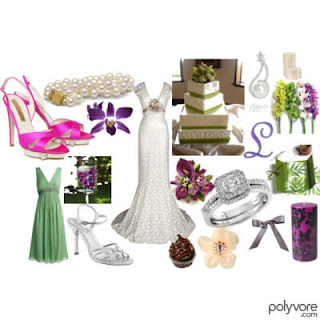
A knottie on my club board mentioned polyvore.com to create an inspiration board. I've never made one before and thought it might be a neat idea.


It was fun searching for wedding items in my colors. I was kind of impressed with how many pictures they offer and how you can search for something and then filter it by color. Pretty neat.
However, it was a real PITA getting it to post on here. I couldn't figure out how to save it as a picture. There was some link on the website saying Post to Your Blog and figured, "hey I have a blog thats where I'm supposed to click." Apparently not. I just got a huge paragraph of HTML text that I had no idea what to do with.
So if anyone else out there creates one of these using polyvore.com and is as HTML challenged as I am, I managed to figure out what I did. And I thought it would be nice to share.
  1. Create an account.
  2. Click on Create at the top.
  3. Type a word into search or click on one of the categories and look through the pictures. Click on the four color block at the right to chose a specific color to filter by.
  4. Click and drag the item to the blank space. You can resize it from there. Options also pop up to remove it, flip it or flop it.
  5. When you've added everything you want, click on Save Draft. Then click on Publish. Enter a title and select a category.
  6. Click on My Home. Click on the smiley face icon by your name. Below it will show the sets you have created. Right click and select Save Picture As.
  7. Then you can upload it to blogs, websites, etc.
Happy Inspiration Board making. I think I'm going to end up making a few of them just for the heck of it. Or maybe creating them for people. That'd be kind of fun. Then again, it could be considered "being a vendor" on theknot and kick me off, so maybe not. :)

Saturday, August 15, 2009

The Dress Adventure


I have some issues with wedding dresses. The first one is that I thought it would be very hard to find a dress that fit my body type. I'm barely 5'2 and very busty. My other issue is that I HATE poof. Crinoline, petticoat, netting, whatever you want to call it - I absolutely hate it. Its itchy, annoying, and just not-my-style.


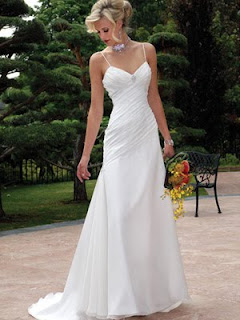
When T and I first got engaged, one of the first things that I did was look for dresses. I figured it would be a really long process to find something that I liked. Then I came across the Maggie Sottero Destinations dresses and I instantly fell in love.


The dress that caught my eye the most is JD8103. So once we got closer to the 1 year mark I started calling stores to see if any of them carried the dress. No one did. I was disappointed, but not ready to give up yet. I ended up finding a company that replicated dresses online and it was 1/3 of the price. I figured, hey, this is my only chance to get this dress, so why not.


Two weeks ago, my mom and MOH came with me while I tried on dresses. The first store carried a lot of Maggie dresses, but not the one I wanted. I knew that I was going to get a Maggie dress and didn't bother to try on any other designers. The 2nd store didn't carry any Maggie dresses, but had Mori Lee ones and a few were similiar to what I wanted. Some of the dresses looked absolutely amazing on me. I would have never expected that. But I could not get JD8103 out of my head.


Last week I started calling stores again and found 2 stores that might have the dress. The first store was really rude to me on the phone and after some googling, I realized they are just horrible to everyone. So, I called the 2nd store. I spoke with the owner, Brenda, who told me that she didn't have the exact dress, but she had it's sister. I scheduled an appointment for today.


I ended up going to the store alone. Brenda had me try on 2 dresses before I tried on the sister dress. As soon as I put the sister dress on, I knew that I needed to order my dress. With no regard to the budget, the fact that I was alone, or that I could wait to order the dress still, I placed an order.


JD8103 is now mine! When I had found the dress online, I cut my dress budget down to factor in the savings. The real dress ended up costing me $200 more, but that included shipping and tax that I never added in for the first dress. In all, the dress came to $492.


While part of me still thinks its crazy that I'm going to only wear this dress for 5-6 hours and its $500, I know this dress is meant for me. I'm never this decisive and I had to have it.


Now I get to enjoy the waiting game. Brenda told me the if the dress doesn't come in by December, then it will come in February. (Apparently Maggie Sottero takes off for January) I absolutely can NOT wait for the dress to come in!


As for the budget issue; well, I went over, but it wasn't by too large of an amount. So, if I don't cut $200 from somewhere else, I'll just take it out of my non-wedding related savings account. My mom also mentioned she would have some money saved next year and planned on giving it to me. So maybe Mom will cover the extra cost in the dress.

Friday, August 7, 2009

The Budget Breakdown

This has changed quite a few times and I'm sure it will again before there is a final "budget breakdown" but I wanted to include it as is. We are calling in a lot of favors from friends to pull this off. Our guest list is approximately 50 people.

Venue - $1050 Local MD Winery, use of 2 rooms for 4 hours. Access to the venue the entire day for set up.
Photographer - $840 An old friend of mine from high school who does this on the side. Definitely the best price.
Caterer - $1000 FI's brothers restaurant will cater for us. We're going for a heavy appetizers style.
Baker - $165 I'm 99% sure we will use a local grocery store. It saves $1-2 per slice.
Rentals - $600 The winery only provides tables and metal folding chairs. I work next to a party rental company and they are providing us with chairs, linens, tables, plates, utensils, just about everything at the 20% off neighbor discount.
Music - $300 An old friend/co-worker of mine does DJ'ing on the side. We asked, he said yes.
Flowers - $400 I found a florist on craigslist that lives minutes from the winery. She works out of her home and is giving us an awesome discount.
Dress - $230 I am ordering a designer-inspired dress from helenebridal.com.
Shoes - $50 I have these already. http://www.unforgettablemoments.com/ in the Jackie style
Invitations - $150 DIY pocketfolds from cardsandpockets.com, the price includes estimated shipping costs too.

That comes to almost $4,800. The officiant, accessories, centerpieces, etc. will all fall in the remaining $1,200.

Thursday, August 6, 2009

Shoe Review


A fellow knottie on the September 2010 board had posted about finding her shoes at Payless and they were a brand called Unforgettable Moments. Bored on my lunch break, I decided to check out the site.


Unforgettable Moments offers 13 different styles of shoes of which 9 have the option to be dyed with 64 different color choices. I've looked at shoes online for quite some time and never have I found anything like this before. FI and I had a previous discussion that he didn't want pink flowers for the wedding but he said I could have pink shoes.


The Jackie style really caught my eye and the fuschia color really stood out to me. On 7/31/09 I ordered the shoe for only $44.99 (impressed by the free shipping) and started waiting patiently.


The shoe arrived today at my work and I could not wait until I got home to try it on. So, I whipped off my flip-flops and put the shoes on. They look perfect. The color is almost exact to what shows on the computer screen and is the exact color I wanted. I am flat footed and I have a really hard time buying heels because most of them come with such a high arch. Not the case with these! Something else that really impressed me is the ankle strap. I was blessed with ridiculously skinny ankles and I've always had to poke a new tighter hole in the strap for it to fit. Amazingly, the last strap was perfect for me.


I am super-happy about these shoes. Like, unusually happy. I think I'm going to have to buy another pair because I don't think I can wait until the wedding to wear them.

Monday, August 3, 2009

Introduction

Hi! Welcome to my Maryland Budget Bride blog. (That's a tongue twister, huh?)

I'm getting married September 17, 2010 at a winery in Maryland. My fiance and I started off with a budget of $10,000 and figured we would come in around $8,500. The budget included everything from wedding party gifts to the honeymoon to my fiance's passport to our wedding bands. It was kind of crazy.

We looked at the budget again recently and decided we're just not the type of people to spend close to $10,000 on one day. We cut all of the unnecessary stuff out of the budget (and kept it to just what's necessary for that day) and started over. So far, I've learned that Maryland really isn't all that cheap. (I blame it on being close to DC where everything is more expensive.) The new budget amount is $6,500 and I want to come in as far under that as possible.

I'm just starting out, but read along to follow my adventures of how to be budget savvy in Maryland. I'll try to include as many links for sales/coupons/deals and specials as I can find, as well as links to other budget brides. One thing that will definitely be here...DIY instructions.

If you are crafty, one way to save money is DIY projects. I have quite a few. And if you're interested in what I've chosen for the wedding so far, check out my wedding website:

www.momentville.com/lovethebeach16

If you ever want to talk to me directly, comment on a post here, or page me on the Baltimore or P&E boards of theknot.com.

Thanks for stopping by!